
I still can’t believe it! I found this pair of old Ethan Allen chairs, secondhand for only $50! They were in great shape structurally and totally worth saving. I am excited to share my experience learning how to reupholster an old wingback chair! This before and after is definitely one of my new favorite DIY project!

Wingback Chairs are classic and timeless
I love a good wingback chair! They are so timeless and beautiful. Wingback chairs emerged in England around the late 17th century. They are made of solid wood and upholstery and have distinct wings originally thought to protect from drafts (in old drafty homes) as well as offer head support. They were also called “fireside” chairs because they were often used near the fireplace.

Wingback chairs come in all kinds of shapes and sizes. Some are more streamlined with a modern look. I’m always more drawn to old wingback chairs with more shape and detail. I think that the ones with curved arms and wings that turn outward are so beautiful. Old chairs seem to be so much more exceptionally well built than a lot of furniture today.
When I found this matching pair (nearly 15 years ago) I was thrilled, but totally overwhelmed with the idea of reupholstering it at the time. I love the shape of these chairs and they’re so comfortable. However, the fabric was old and sad so I decided, it’s time to learn how to reupholster these chairs!
Inspiration & Choosing Fabric for a wingback chair
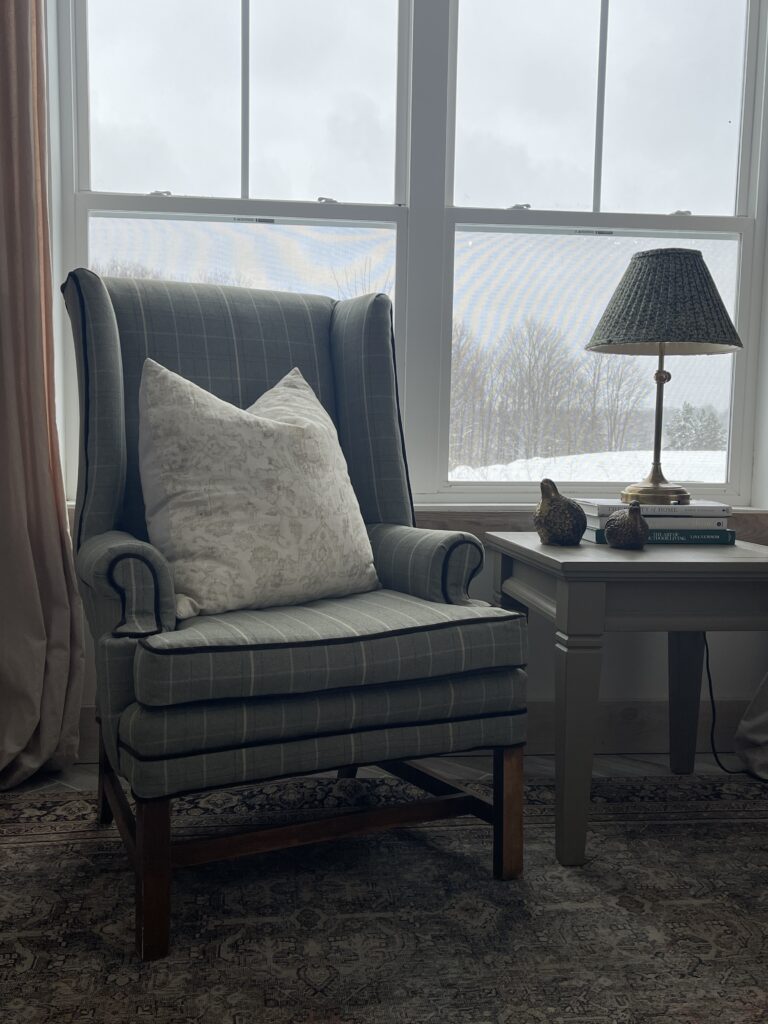
These two old wingback chairs have very high backs and the wings turn outward a bit at the top. They have curves but their also tall and really solid (not dainty). Since they have soft curves, I wanted to find fabric that leaned a little more masculine.
I looked through a bunch of fabric samples and loved this cypress green plaid fabric from KOVI Fabrics.com! I did a lot of research before choosing this fabric because if I’m going to put in all the time and effort to reupholstering these chairs, I need them to last!

This fabric is very durable exceeding 200,000 double rubs and is Eco Friendly, Fade Resistant, Made In America, Performance Grade, Pet Friendly, Stain Resistant and exactly the color I was looking for!

I really wanted to take a little bit of a risk and make all the piping with velvet in a contrasting color. I’ve pinned countless pictures of old English homes that have gorgeous furniture with contrasting piping and I just had to try it!
I narrowed down the velvet samples to these three colors Riverstone Velvet, Cigar Brown Velvet, Garden (hunter)Green Velvet. It took me a while to decide which color to use because they were all so pretty, but in the end, the Cigar Brown velvet won my heart!
Reupholstering an old wingback chair yourself vs. buying a new chair
I was curious about the chairs themselves, so I “image searched” them. Even though I didn’t find the exact chairs, I did find some for sale that were almost identical to mine. They were old, had been reupholstered and were also structurally in great shape.
Except the chairs online were listed at $6,200 per chair. I was pretty shocked when I saw that price! I’ve always loved restoration projects, but seeing that number gave me even more appreciation for DIY. It kind of makes me wish I had kept track of every home improvement project I’ve done in my lifetime. It sure would be fun to see how much I’ve saved myself by DIYing things instead of paying retail! THIS is why I love DIY! Not only can it save a ton of money, but I can create something that is completely custom!
A wingback chair of this size and shape will use every bit of 6 yards of upholstery fabric (54 inches wide) and 1 additional yard of fabric for the welt cord/piping. I ordered 12 yards (and should have ordered extra to be safe) and it was enough for both chairs, but barely. Quality upholstery fabric can easily run from around sixty dollars to a few hundred per yard. Yes, the fabric alone is still a decent investment for a DIY project, but for me, it’s well worth it! You can easily find beautiful upholstery fabric in a lower price point if need be.
Upholstering Tools and Materials I used to reupholster my wingback chairs
- KOVI Upholstery Fabric
- Upholstery Thread
- Welt Cord
- Upholstery Dust Cover Fabric (for finishing the bottom of the chair)
- Cotton Batting
- Sewing Sheers
- Sewing Machine
- Sewing Pins
- Self Healing Mat (optional)
- Rotary Fabric Cutter (optional)
- Staple Gun
- Air Compressor
- Rubber mallet
- Small Finishing Nails (to secure the arm plackets)
- Staples
- Awl Tool
- Pliers
- Staple Remover Tool
- Sharpie Marker (to label old fabric)
- Paper Cardboard Strip
- Metal Flexible Tack Strip
- Zipper (for seat cushion)
- Welt Foot for Sewing Machine
- Zipper Foot for Sewing Machine
- Safety Glasses
Steps to Deconstructing A Chair
I think the most challenging part of reupholstering a chair is deconstructing it first. You’ll need pliers, a staple remover or something to pull off the fabric, welt cord, staples and any metal tack strip it may have. You may even want to use gloves. It took me a couple days (about 4 hours each day) to remove all the fabric and staples from my wingback chair.

Before you remove anything from the chair, grab a notebook and pen so you can take notes. The more notes the better. You also will want to mark with a sharpie each piece of fabric you take off. Mark it so you know the top from the bottom. Label the fabric with indications like “L.O.W.” (left outside wing). If you Label every panel you ONLY on either the top or bottom (your choice). If all your labels are only on the top, you’ll know what is the top and what is the bottom of the piece.

These panels will be so helpful when it comes time to cut out your new fabric pieces. Once you know how you’re going to label each piece you can start by removing the bottom (underneath the chair) fabric.You’ll then remove the back panel of the chair.

Pay attention to the order of each piece and how you HAVE to take it off. This will tell you how it has to go back together. You’re going to reverse engineer it.
Steps for deconstructing wingback chair
- Bottom of the chair (black dust cover fabric)
- Welt cord around entire chair bottom
- Entire Back panel
- Welt cord around back panel
- Outside Wing L Shaped Panels (left and right wings)
- More welt cord around the wings
- Front Facing Upper Center chair (back)
- Inside Wings (left and right)
- Rounded Rolled Arm Plackets (had 4 small nails holding them in) They also had welt cord around them
- Rolled Arm Pieces (left and right)
- Panel under the seat cushion
- Front lower panel across the front of the chair with welt cord
Making Welt Cord & Sewing A Box Seat Cushion
After I had all the fabric pieces and staples removed from the chair, I moved on to making the piping. I saved all the piping I took off the chair so I could measure how many inches of piping I would need to make. Each chair needed 500 inches of welt. So, I made a little over 1,000 inches of velvet piping because I have two identical old wingback chairs to reupholster.

I used my four foot ruler to help cut straight lines for the welt cord. The grain of the fabric (in this case velvet) matters. I paid careful attention to make sure I sewed the strips of velvet with the grain running the same direction.

Next, I moved on to making the seat cushions. I wanted to make the cushions before reupholstering the chairs because I wanted to see exactly where the strips would sit. I’m not sure if that’s how professionals do it, but I was more comfortable starting by sewing the seat cushion first.

I’ve never made a seat cushion/ box cushion before so I was nervous. Especially because I really wanted all the stripes on the plaid fabric to line up. To learn how, I watched a videos showing the steps.

If you’re a visual learner and want to see every step, I highly recommend following Mimzy&co. on YouTube. She does a great job of explaining all the steps for all her videos and it was helpful to see how she sews a box cushion and a back zipper placket as well!

To get started, I took the cushion covers off the old seats. Then I cut them up and used the pieces as pattern to make the new seat cushions.
I also spent some time practicing lining up the strips on my fabric scraps while sewing the welt cord/piping on BEFORE making the cushions. I’m so glad I practiced first, because it took me a few tries before I had the hang of it.

I made both seat cushions at once instead of making one now and one when I reupholster the second chair later.

I’m so glad I made the cushions first. It made it really easy to line up all the other stripes once I moved on to reupholstering the body of the chair. I just placed the cushion in the chair and lined all the stripes up!

I also decided I didn’t like the white chalk paint on the legs. So I sanded the wood legs and stained them a rich medium brown color before starting to reupholster.

Cutting New Fabric and Reupholstering the Chair
To reupholster the chair, I reversed the order. So the last piece of fabric I took off the chair was the first piece of fabric I put back on the chair. I used my self healing mat and rotary cutter to cut out each piece (using the saved templates).

I only cut out one piece at a time though. I also gave myself plenty of extra fabric for each template piece. The fabric has to be pulled around the chair and stapled in place and you’ll want plenty of extra fabric to grab hold of. Then you can trim off the extra fabric once it’s secured.

I made sure to line up that first piece up with the stripes on the cushion, staple it in place, before moving on to cutting out the next piece. I was very careful to lay the template pieces in the correct spot on the new fabric based off the plaid strips.

Some chairs will need all new batting or seat cushion. You’ll have to determine that once you have your chairs old fabric removed. I replaced some of the batting and was able to reuse some of it on my chair. If the batting is ripped or lumpy I would replace it. You want you chair to be as comfortable as possible when you’re finished.

Every wingback chair is a little different. These old chairs have curved wings and the arm plackets are rounded at the top and bottom. Some chairs have arm plackets with a round top and a strait edge on the bottom half that dies into the frame of the chair. Each chair will have it’s own unique order of how the fabric and piping must go on.

The key is to take all the notes you can and take pictures of each step while you’re deconstructing the chair for reference. As I mentioned before, the fabric and piping must go back on in the opposite order of how it came off. Starting with the bottom, then back, then working your way forward.


Learning how to reupholster has save me thousands!

These wingback chairs had a lot of this flexible metal tack strip that I had to replace. The strips I pulled off the old chair broke. Each hole needs a staple through them and the part with the hole faces the piping. The teeth on the other side is what holds the fabric.
Once the strip is stapled onto the chair where it needs to go, I used the awl tool to fold the fabric edge under and into the teeth. Then I used a small rubber mallet to hammer down the teeth, working the fabric as I went.


I really enjoy learning upholstery! It feels really rewarding and it’s a lot of fun learning a new skill. I know It would have run me at least $100 per hour + the cost of the fabric (in my area) to hire a professional to reupholster these chairs. I recently I reupholstered 12 dining chairs for our DIY Dream Home I found on Marketplace so I decided to invest in a few upholstery tools instead of hiring someone to do the job.

I am so glad, because now that I have the tools, I can take on more upholstery projects! I’ve already ordered a few dozen more fabric swatches from KOVI Fabrics because I currently have 2 antique sofas, a chair & ottoman and another desk chair to reupholster for the new house!

What do you think?! Would you try giving an old chair new life? If so, what kind of fabric would you choose? Would you go bold and use a contrasting fabric for the piping? I love it so much that I’m starting to get the itch to reupholster my velvet headboard with a contrasting piping now! Shhh, don’t tell Aaron…I shouldn’t even mention a new project in his hearing until I finish all the ones currently piled up in my garage:)

If you want to try your hand at reupholstering a chair and you’re a visual learner, defiantly take the time to watch this video through and feel free to reach out to me here, on YouTube or on Instagram ! Now that I have one old chair all finished I’m off to reupholster the second chair! I can’t wait to see them both done! Wish me luck!


