
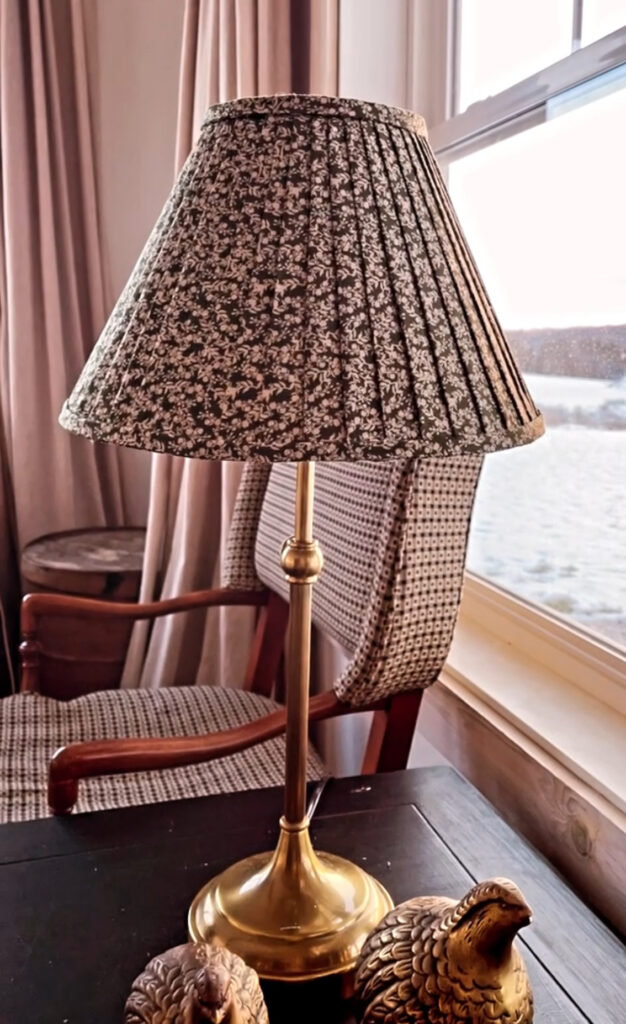
Today I’m going to walk through the steps of how to make a pleated lampshade without any sewing at all! Pleated lampshades are so beautiful and are one of the easiest beginner friendly home decor DIYs. Last year, I found a gorgeous vintage brass table lamp (with a really plain shade) antiquing one day and got the idea to cover it!
Keeping It Simple
A lot of tutorials for making a pleated lampshade are more complicated than the way we’re going to make ours. This is the SIMPLE way and honestly I prefer the finished look of this method even better than other ways (more complicated ways) of making a fabric pleated lampshade. The goal is to DIY without it looking like a craft project…we’re going for more of a custom, professional look!

Materials You’ll Need To Make a Pleated Lampshade

- Lamp (similar) & Lampshade (similar)
- Fabric
- Hot Glue Gun & Glue Sticks
- Fabric Sheers
- Ruler or Measuring Tape
- Iron & Ironing Board

Step 1- Measure Lampshade & Choose Fabric
How much fabric you’ll need for this project depends on the size of your lampshade and the pattern on the fabric you’re using. One yard to 1.5 yards of of fabric will be all you’ll need if your shade is on the smaller size, like mine is. If you have a larger scale pattern on the fabric, make sure it repeats (so you can cut out more than one fabric section to make your 2 inch strips out of. If the fabric is a solid color or has small repeating patters that you’ll be fine with 1.5 yards for your lampshade.

Start out by measuring your lampshade from top to bottom. Add a 2 inches to that measurement. That gives you an extra inch for the top and an inch for the bottom. Don’t worry, we’ll trim and finish off the top and bottom edges at the end. Once you have you’re measurement and add 2 inches, go ahead and cut out your fabric.

My lampshade was 10 inches (tall) from top to bottom, so I cut out my fabric at 12 inches. I just used an old school ruler, drew my cut line with pencil on the back of the fabric and then cut it out with fabric scissors. If you happen to have a rotary cutter, that would speed this step up, but it really didn’t take me long to cut these with my scissors.
Step 2- Cutting & Prepping Fabric Strips for Pleated Lampshade
Once you have your piece of fabric cut out, you’re going to it into strips that are 2 inch wide. For my lampshade, I made my fabric strips 2 inches wide by 12 inches tall.

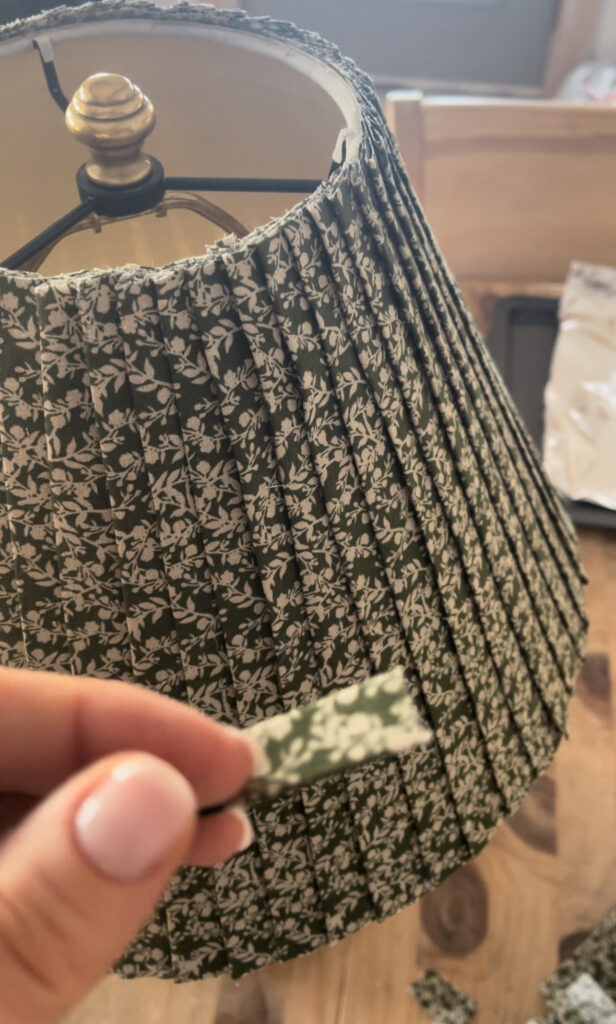
When you’ve finished cutting all your strips out, fold and iron the strips into 1/3 (long ways). Don’t fold them down the center, fold one side over (about 1/3 of the strip) and then iron a crease in it.

Step 4- Attaching Fabric Strips to the Lampshade
Now that all your fabric pieces are prepped it’s time for the fun part. You’ll need to warm up your hot glue gun and grab a few glue sticks. We’re going to attach each piece to the lampshade one at a time.

Start by placing a small dot of glue ONLY at the top rim of the lampshade. Don’t worry about the bottom of the fabric or lampshade, just let it hang there. You want to make sure that hanging strait down off the edge of the shade while it’s drying. It only takes a moment for it to set.

My lampshade is not the same circumference at the top as it is at the bottom. It flairs out a little bit at the bottom so I need my pleats to be closer together at the top and more spread out at the bottom of the lampshade.

Move on to spacing the second strip maybe a 1/2 inch apart. Attach the second strip with a dot of hot glue at the top. Make sure the raw edge of the fabric is facing in the same direction as the first strip you attached.
Also, be sure that the nice folded edge is facing the same direction as the first one well (of course). Repeat this step over again around the entire TOP of the lampshade, one at a time, all while letting the bottom of the fabric strip hang loose.

After you have the fabric strips attached all the way around the lampshade at the top, move on to the bottom. We’ll use a small dot of hot glue to attach all the strips to the bottom of the shade while paying attention to the spacing between each strip.
Try and keep the spacing spread out as evenly as you can! That will give your pleated lampshade a more professional, clean look.
Step 5- Finish The Pleated Lampshade
Now that every single strip of fabric is attached at the top and bottom of the shade we can finish it up. Trim off the extra fabric all around the top as well as the bottom with scissors. Take a quick measurement of the circumference of the top of the lampshade and the bottom (if yours are not the same dimensions).

Next cut out two strips of fabric that are both 2 inches wide and the lengths of your two measurements you just took. One will wrap around the top and the other will wrap around the bottom of the shade. Before you attach it, fold it into thirds and iron it. Your fabric should have both raw edges folded in on the back side. When you flip it over you’ll have two clean edges. We’re going to wrap it around the top and bottom of the lampshade horizontally.
Add a small dab of hot glue on the top edge making sure the fabric strip covers the raw edge of all the vertical pleated fabric strips. Add a little glue as needed and press the fabric strip down into it carefully, all around the top. When you get all the way around to where you started, fold the end over to hide the raw edge and glue down with a little dot of hot glue. Then repeat all the same steps on the bottom of the lampshade.

Simple Home Decorating DIY Projects To Try
There is something so satisfying about hand making something special for my home. I vividly remember my mom hand making all kinds of things when I was a child. If she wanted something for her home, her first thought was to make it. I guess that mindset rubbed off on me.
There are so many ways to customize our homes and make them feel cozy with handmade decor. I love simple diy projects like making pillow covers, sewing pinch pleat curtains, and sometimes making affordable paintings and frames out of craft paint/wood trim. I also love making prints on canvas look like real oil paintings.
If you love home decor DIY projects like this, I share lots of fun projects over on YouTube. I recently took on a much bigger DIY project and share the process of learning to reupholster old wingback chairs in this video!


I have a lamp that could use a new shade and I love how easy this looked!
Thank you! I have another lampshade that’s a different size and shape I want to transform next!
[…] not super old, I loved the brass and how dainty it was. I transformed the lampshade with a simple pleated lampshade DIY project and I love how it turned […]