
We’ve poured a lot of hard work into hand building every inch of our dream home the past three years. This past fall, we built the porch structure and I’ve recently been focused on how to design a beautiful historic front porch. I had a vision in mind long before we built the porch and now it’s time to narrow down all the finish work and design details.
I love a charming front porch! It’s a place where we welcome our loved ones into our home, sit and maybe watch the kids play or sip our first cup of coffee on a summer morning. It’s something that was an integral part of historic homes and it’s really important for us to bring that same “old world” charm to our new build. I have a lot of design decisions to make and materials to finalize and I thought it would be fun to walk you through my thought process.
Where I’ve Been Finding Inspiration
I didn’t go to school for design or architecture but I’ve been fascinated by historic homes and properties as long as I can remember.
I find inspiration in old books, I study the details of period homes designed by my favorite architects and love walking through historic districts just to soak in all the architectural details the beautiful old homes have.
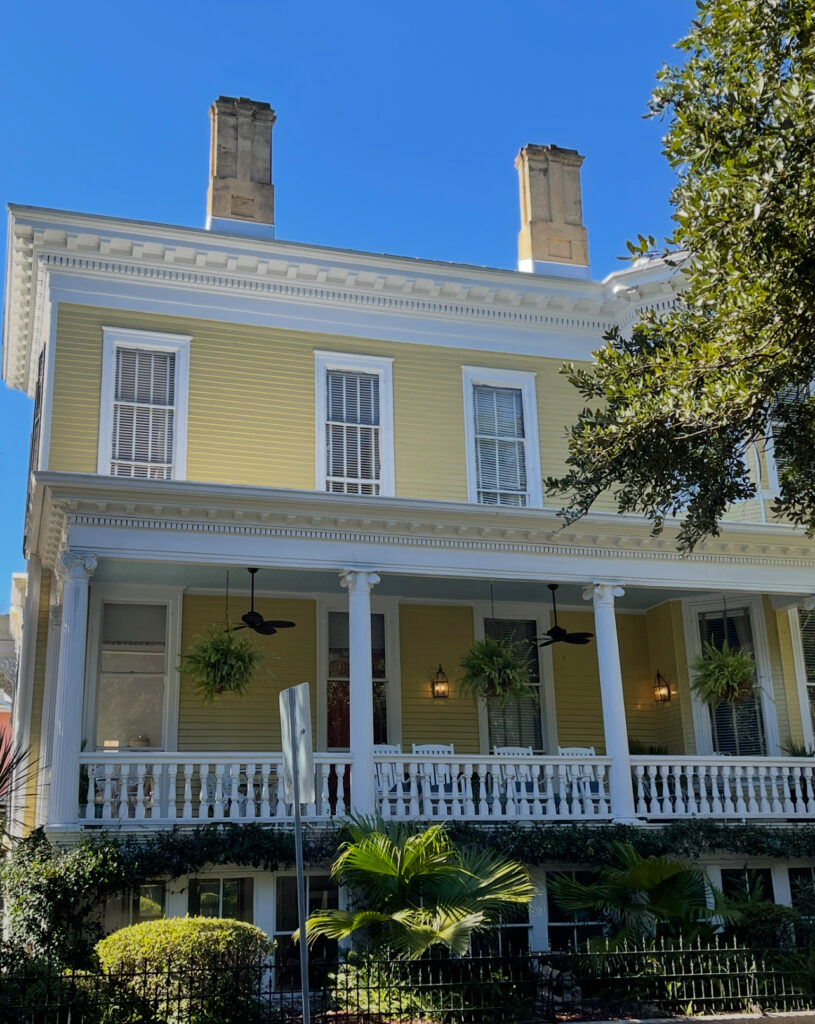
We also love to travel and have found so much design inspiration by wandering the streets and touring historic homes in places like Charleston and Savannah.

More recently, the streets of Paris and little villages in France.
I’ve been particularly inspired by Period Architecture, Ltd ever since I came across this photo on Pinterest. The attention to detail, the stonework with the white siding, it made my jaw drop! That led me to studying more of their homes and other period properties to really narrow down what I liked and why.

Their website states: Well-versed in historic styles, Period Architecture considers the character of a region to unite architectural traditions of the past with contemporary lifestyles and technology. The firm’s uncompromising and inventive designs, whether historic or contemporary, appear as if they have always been there and always will.
While our home is much more humble than the elaborate homes on their website, our considerations are in line with their goals in regards to designing a timeless home.
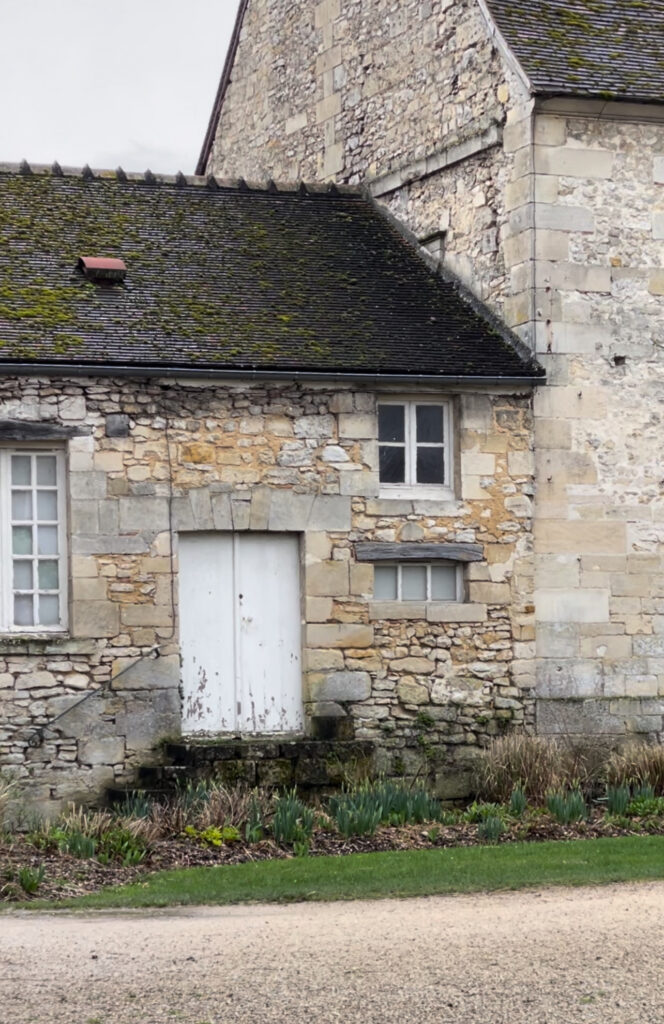
While I love a lot of different period home styles, all of them have one thing in common and that’s all the stonework…I love it! It’s so beautiful. I am so happy we had enough stone leftover from building our pavilion columns to build a skirting around the front and side of the house. It makes me smile every time I look at it (especially when I remember, it only cost us the price of the mortar)!

Front Porch Key Elements on Historical Homes
- A great front porch is welcoming and inviting!
- Most historic porch ceilings are some type of beadboard or wood tongue and groove. Sometimes it’s stained but most of the time the ceilings are painted (often a light blue).
- All porches have columns, posts, beams, detailed molding that have distinct characteristics that fit the architectural style of the home.
- Lighting is an important part of giving a home a historic charm. Either an electric lantern style lighting or gas lighting is what I find on period homes most often.
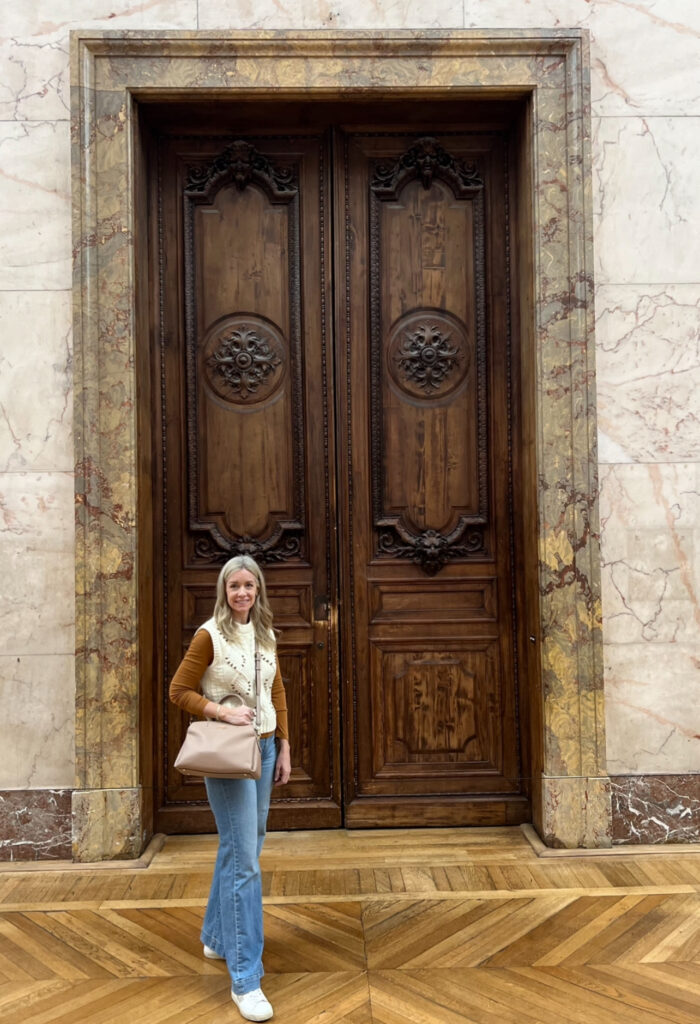
- Solid wood front doors that reflect the style of the home. Salvaged historic doors are a great way to add charm to a new build. If you can’t find a salvaged door, consider having one made to replicate an antique door.
Building Our Porch Structure
Here’s where we are at with our porch. The entire structure of our porch is built but it it far from finished. We currently have an 8″ reinforced concrete slab as our porch floor that we plan to lay either a thin stone or a thin brick down the road. For now, it’s fine.

We have eight treated 6×6 posts each connected to the concrete with CPTZ™ Concealed Post Tie bases. The posts are attached to the porch beams which then hold up the rafters and entire roof.
That is where we left off. Winter came and we moved into the house to work on plumbing and HVAC. Now that the snow is melting, it’s time to get my mind back to figuring out how exactly we’re going to finish the porch.

You can read more about the process of our porch build HERE if you’re interested.
Porch Columns & Posts
Porch columns play a huge part in the design of a home. With every architectural style you will find a variety of porch columns, or in some cases, posts.
They say as a rule of thumb, the scale and size of a column is that for every foot of the porch roof height, add one inch to the width (starting at the column base). So, that means if the porch roof is eight feet tall, our column at the base should be 8 inches. If it were any narrower, it would look really tiny and if it were any larger it would be way too overpowering. If the porch roofline was 10 ft tall, then we’d have used bigger posts.

We used 6×6 posts as our structural support. That leave us 2 inches of width we can gain to build out the posts with base/bed molding, trim work and of course we have to figure out the best option for an the cornice, frieze, architrave and such.
Designing Beautiful Porch Beams
Wrapping and trimming out the beam with detail moldings is really going to make a huge difference. Trim can take a plain beam and add interest and dimension. The choice of moldings we chose matters a lot.
If you use rim that is simple and flat would give it more of a craftsman look. Something with more detail, like dental molding can make a home more Greek or Georgian Revival. Victorian porches have ornate trim work and things like gingerbread moldings and decorative railings.

We’d like our exterior to lean more towards a “New England”/ “Colonial”/ “Pennsylvania Farmhouse” design style. Some hallmarks of the Pennsylvania Farmhouse Style is a stone exterior, with high pitched gable roof and symmetrical multi-pained windows.
We’ve incorporated all of those things into our build and need to make sure that the front porch and front doors stay true to that design style when we build out the frieze beam. Adding molding to the beam with a bit of a detailed profile will cast a shadow and give it some dimension. We won’t use anything too ornate, but we definitely want to add a bit of detail.
Porch Railings or Balustrade
Our front porch slab is just a few inches above grade so building code does not require a railing for safety and we just prefer being able to walk on and off the porch from any location. While there are so many beautiful ways to add historic detail with porch railings, we’re not adding railings to our porch.
Of course we could add railings if we wanted to purely for aesthetic reasons and curb appeal…we’ve just opted not to. I think we can create a beautiful front porch that feels historical without a balustrade.
I haven’t narrowed down what all I want to do in regards to landscaping around the porch or the sidewalk up to the house just yet, but I do have a lot of ideas. I just need to get all the details of the porch nailed down at this point.
Choosing Light Fixtures & Lighting Placement for the Porch
I put a lot of thought into choosing the light fixtures and placement for our porch. I wanted a lantern look. Nothing too modern. I especially love the look of a flickering gas lantern on a cozy porch. That feels historical and timeless to me.
Aaron was totally on board with gas lanterns, however the price difference in the gas lanterns vs. electric was a deal breaker for the budget. We could justify it if we only had to install 3-4 exterior lights, but we have SO many. This could be a design decision I’ll regret down the road, but never the less, we’re going with electric lights and not gas.
That decision lead me searching for a electric lantern style fixture that closely resembled a gas lantern. There are a lot of lantern style of lights, but the key thing I was looking for is the little (faux) gas pipeline at the back of the light. Some lights have them and some don’t. The lanterns that have that little feature make an electric lantern look a lot more like it could be a gas light.

The other thing gas has the electric lights don’t is the beautiful flicker. I’ve seen quite a few different light bulbs on the market that flicker and give the illusion of a gas lantern. So, you bet I’ll be giving them a try! I’m hoping this is a good compromise.
There are really only two placement options for lights…ceiling fixtures or the wall mounted. I chose the wall mounted fixtures for two reasons. The first reason being that our porch ceiling isn’t flat. It is sloped to give us more head room. If we had pendant style lights, they’d feel a little low. If we had a higher porch ceiling, than we’d maybe have gone that route. The second reason we chose wall lanterns is because they are more historical and iconic. Different types of exterior wall lanterns have been used for centuries, while ceiling lanterns are much newer.
I ordered these lantern lights for the entire exterior, not just the porch. We’ll install one on each side of our main entry (double) doors, and one near every other exterior man door or patio door as well as two larger ones for either sides of our garage door.
The Challenges of Choosing The Right Materials
Choosing a few materials for our porch is where I’ve gotten a little hung up. I am drawn to real materials. I can spot PVC on porches and it looks like plastic up close. Even though wood is a lot more maintenance, it looks so much better (in my humble opinion).
With that in mind I have decided on the materials for the porch ceiling. We’ll be using wood bead board/tongue and groove planks.
I think the next think I need to do is bring home some PVC trim and wood primed trim and test out the look next to the porch columns. I just can’t see myself being happy long term with something man made. Sure, I’ll have to repaint them from time to time over the years, but it might be worth it to me.

I am SO happy with our choice to lay the full limestone skirted wall around the front of our home! I always prefer natural materials to man made options and this stone is gorgeous. It gives the home historic charm and it was the right choice for sure. If we had chosen a faux stone facade, it would have been extremely obvious, when you got up close, that it wasn’t reel. It was a lot of extra work but it was totally worth it in the end!
I’ll keep you updated on whether or not we go with the more maintenance free option or if we opt for wood. I’d love to know your thoughts! Would you choose the natural materials or the more maintenance free options?
Beadboard Ceiling- Paint Colors & Wood Stain Options
The porch ceiling will hopefully look very timeless with the wood beadboard planks we’ll be installing soon. I need to choose a finish for the ceiling before we install them because it’s a lot easier to stain or paint the planks before installing them. Working with stain or paint over my head (and the concrete) with our winds would be a nightmare! I’ll be finishing them before installing the ceiling and then just going back to touch up the nail holes or any scratches later.

It this point I haven’t decided on whether I should paint the ceiling (the same color I’m painting the front doors) or stain the beadboard a beautiful medium warm wood tone. I’m not going to make a decision until I test a few stain colors and paint on a few scrap beadboard planks. So, stay tuned for that!

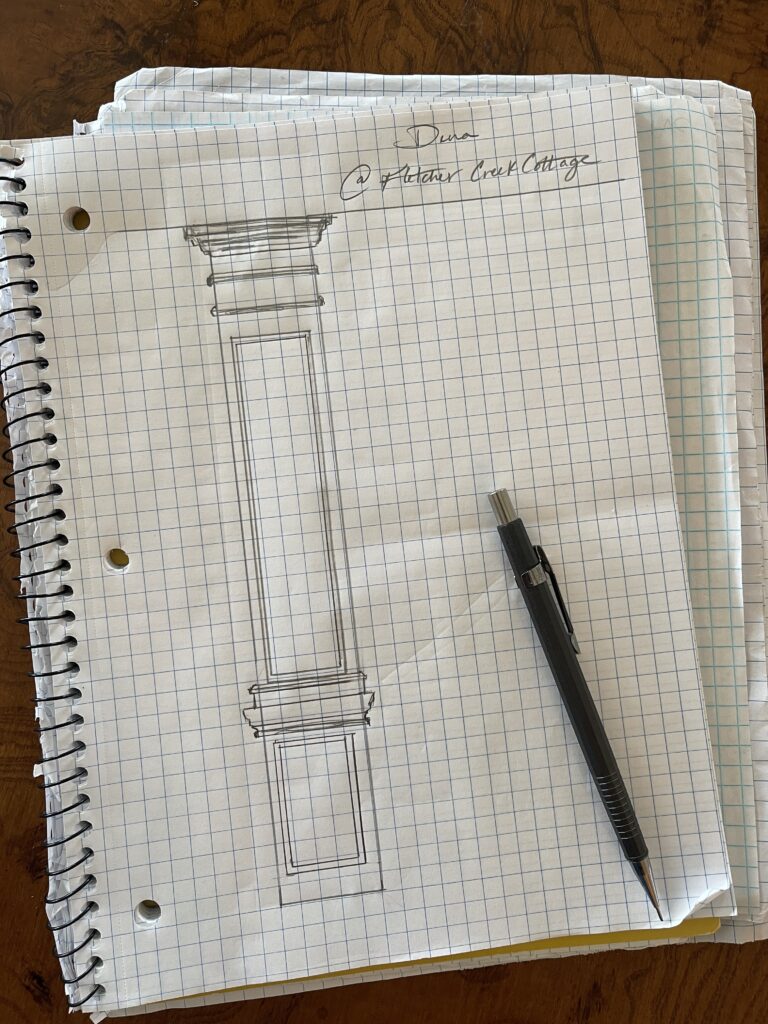
My Design Ideas To Add Historic Charm To Our Front Porch Posts
These are some rough sketches, but it’ll give you an idea of how I’d like to trim out the porch posts. We’re going to build out a bit of a pedestal for the lower 2-3 feet of the post. Then we’ll wrap the rest of the column above the pedestal adding some molding and finishing it off at the top of the post with crown molding/trim at the beam.
Our porch won’t have a grand feel because it’s really not very massive. Hopefully it’ll have a cozy feel to it though. Our porch roof is standard height. We actually couldn’t raise it up any higher because of our transom windows above the porch. We had to attach the porch ledger board just under those windows so we couldn’t have a very tall porch roof so that meant we couldn’t build a taller entablature. Never the less, I know we can work with what we have and we’ll be able to create a porch that feels classic and more importantly, welcoming and inviting.
With all that said, I always keep in mind that anything I design, we have to actually build by hand. If we don’t have the carpentry skills to actually build what I dream up…that really can slow us down. At that point we’re learning by trial and error with costs us in our time and sometimes in wasted materials…not fun.
So there you have it! That’s a look into my thought process and all I’m working on regarding finishing up the porch. It has definitely taken a lot of time and research for us to learn how to design a beautiful historic front porch and we still have a lot of work ahead of us, that’s for sure! Thank you for following along with our DIY Dream Home build and for all your continued support and encouragement.
If you missed our Porch Build Video, be sure to check that out below and remember to subscribe to follow along with entire DIY Dream Home build process!


These front porch ideas are actually great. Thanks a lot. Designing such wonderful porch can be a nice thing to consider. Keep posting more good information like this.
Quick Step Thick Flooring